August 30, 2009

Shopping Therapy

Halloween 09 18 After a looooong Seven Weeks confined at home and only leaving to go to  Hospital, Doctor and Physical Therapy, Yesterday was My Day..!!! Bill packed ME up in the car and we Took Off down the road to my favorite shopping place an hour and twenty minutes away.


Needless to say, it WAS much harder than I expected, however it felt SO Good to get OUT..!!! Our first stop was my Favorite StoreHome Goods…  And look what I found….:):):)
The store was loaded with Bright Rich Warm Colors of Fall…packed full of hard to resist treasures….
Halloween 09

I fell in LOVE with HER….So charming and just sitting there Waiting for ME…!!!! And only $9.99…She will be perfect with my other vintage collections. NOW, I usually don’t Show You what I have until it all finds the perfect little spot to perch for the season. But…since it will take me a “little longer” this year, (can’t Move as Fast) as before, I thought YOU might want to SEE my goodies so you can hurry out and grab them for yourselves before they are “All Gone”…!!!
Halloween 09 3

Then I found this “Trick or Treat” box adorned with this wonderful pumpkin on top.  Price..??? $6.99 Can you believe it…!!!

Halloween 09 2 And “What A Hoot”…!!!  Couldn’t resist this Wise ole fellow….Cost me $7.99
Halloween 09 4 Then  on to the Next Store….Pottery Barn…
Halloween 09 10
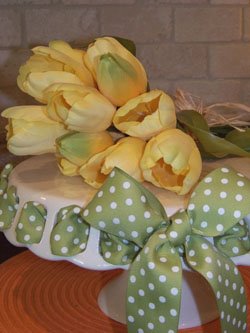
LOVED these Flowers…and the yellow Tuscon stoneware pot.   Remember…nothing is “Arranged ”…
just poked inside for Pictures..!!! I was hoping this large vase of flowers would sit on my kitchen counter. Not sure yet…we’ll have to see Where it Looks Best..:) 
Halloween 09 5
And Napkin Rings to match. These will look perfect on my Fall Table… 
Halloween 09 7 Halloween 09 6
And now for My Favorite Find of the day…..Ta da…..Just LOOK at this Beautiful felt pillow…Layers and layers of scalloped felt that leads up to a Pretty Petal at the top…:)
Halloween 09 13My pictures Do Not show the True Beauty of this gorgeous pillow.  One of my favorite chairs in a pretty shade of green silk with embroidered flowers needed a Perfect Pillow to add charm but not take away from the chair itself. When I Spotted this Beauty, I snatched it up immediately. It’s Perfect. I Wish YOU could See the True Color of both the chair and the pillow. Rich..Warm..Charming.
Halloween 09 11 Halloween 09 17 
  OK…..If you LOVE my goodies, then HURRY on over to Home Goods, where you will find the Best Quality products at a fraction of what they cost in other stores….:) LOVE THAT STORE…!!!!  Not so lucky at Pottery Barn though, however when “ Ya Gotta “ have it , well, you just pay the price, take it home and Love it….:)

First day Out yesterday…since accident. Except for hospital, doctor and physical therapy.!! Going out for the day and first time in public in a wheel chair, Nice but harder than I expected….Then I saw a younger lady on crutches with ONE LEG…
I whispered “Thank You God” that mine is only broken. What blessings we have if we only OPEN OUR EYES….!!! Count ALL your blessings each day…
 Poof Fairy More will come your way…:)


August 23, 2009

Katie Turns 3

Katie 3 7Lg
It was a Happy Happy Day, watching the gleam in her eyes as she danced and pranced around in her pretty Minnie Party Dress…!!!
SHE was excited and just  couldn’t wait for a cake and presents….!!!
Katie 3 18Lg 
All the adorable decorations were made by my daughter. They were So Pretty and Katie Loved them…!!Katie 3 5Lg
 
She even had a dress to match.
Katie 3 36lg 
Say Cheese….OR….Icing…!!! SHE couldn’t wait for a Taste of that yummy icing….So in goes the finger….and YUM….!!!!
Kaite 3 22lg  Katie 3 22Lg
Katie 3 16LgThis hung over the Party Table…So pretty…!! and then behind it over the window was another banner and balloons…
Katie 3 medKatie 3 23Lg  Everything was Katie approved..
Katie 3 19Lg
Katie 3 17LgKatie 3 4Lg Katie 3 20Lg
Soon it was TIME for Presents…:) And SHE was ready..!!
Katie 3 26lgKaite 3 24lg

Even the family room with was decorated with Birthday Fun…!!!Katie 3 9LgSo excited….then Ooopps went the hat….:)Katie 3 25lg  Where’d everyone go..!!!      Katie 3 24lg

Little Katie had So Much Fun and when she opened her Little Mermaid costume, she had to put it on Right Now….:)
Katie 3 28lg Katie 3 37lg

Missy had a Birthday Message for Katie on her kitchen counter…It was a wonderful Sweet Day with all my girls…
Katie 3 3lgIf YOU have a Party or Celebration coming up and need some adorable banners, hats and more, then visit my daughters shop at www.partypops.etsy.com to SEE all the wonderful fun items that she can create Just For You…:)
Katie 3 19LgMake  Home as Sweet as a Cupcake…..Celebrate it…!!!
Poof Fairy   It’s A Happy Home…!!!

August 19, 2009

Ribbon Love

It’s No Secret…I LOVE Ribbon…All colors, styles and patterns. And I Love adding their wonderful Charm and Whimsy to So Many of my things. I’ve always loved Bows and use them on anything I can get away with. When I was a young Mom with two little girls, they always had a bow or ribbon in their hair. I dressed them with Sashes and Bows. Even when they went outside to play, they always wore ribbons and bows in their hair. And I Love ribbon headbands. Look at these fabulous designs I found, made from beautiful ribbons.

Ribbon headbandsHere are some BASIC WAYS TO
COVER HEADBANDS WITH RIBBON: 

Ribbon headbands

  • SPIRAL WRAPPING
    • Cut ribbon about twice as long as the band
    • Coat both sides of band with permanent glue stick
    • Begin wrapping on the inside at one end
    • Continue tightly wrapping on angle to other end, pressing into the glue coating
    • Fold under raw end of ribbon
    • Use a few stitches to secure ribbons that cover the ends of the band
    • Ribbon headbands
      ENVELOPING
      • Use this method for ribbons at least twice as wide as the band
      • Cut ribbon 2” longer than the band
      • Fold 1” under on both ends of the ribbon
      • Fold ribbon in half lengthwise
      • Coat both sides of band with permanent glue stick
      • Slip band into folded ribbon & secure with a few pins
      • Stitch ribbon edges and ends together
        Ribbon headbands


          FOLDING

    • Use when ribbon is at least 2½ times the width of band
    • Cut ribbon 2” longer than band
    • Coat inside of band with permanent glue stick
    • Position one long edge of ribbon onto glue, 1” extending from each end of band
    • Apply permanent glue stick to outside of band
    • Fold the1” extensions over ends of band
    • Wrap ribbon around edge onto sticky outside of band
    • Apply permanent glue stick to exposed underside of remaining ribbon
    • Wrap tightly over the edge & press onto inside of band

    Ribbon headbands

    .

    Ribbon headbands

    ENCASING
    • Use when ribbon and band are the same width
    • Cut 1 piece of ribbon the same length as the band, and 1 piece 2” longer
    • Apply permanent glue stick to inside of band & adhere shorter ribbon
    • Apply permanent glue stick to outside and adhere ribbon, allowing 1” extensions on each end
    • Turn under raw ends of ribbon and wrap extensions over both ends and stitch
    • Stitch both ends together
    • If band narrows at the ends, fold extra ribbon to the inside evenly on both sides and stitch

    .Love Those Flowers?  Here's how it's done:

    Ribbon headbands

    Materials:

    • Ribbon ( 1½” wide)…36”     
    • Wire:  …8”
    • Bead or button for center of flower
    • 2 ribbon leaves
    • Gathered green ribbon (3/8” wide)…4”
    • Thread to match plaid and green
    • Permanent glue stick.

    .
    Flower:

    • Center a bead or button on the wire, then tightly twist the wire into a stem
    • Cut ribbon into two 18” pieces, prepare both per ILLUSTRATION #1 below      
    • Hold the end folds in place with a dab of glue
    • Expose the ribbon’s wire at point B
    • Holding wire in place at point A, carefully pull exposed wire from B to create gathers.
    Ribbon headbands
    • Place the stem on the gathered ribbon at point A, as in ILLUSTRATION #2
    • Roll ribbon once or twice around the stem, keeping gathers fairly even
    • Tack ribbon in place through several rolled layers, keeping gathers balanced and the roll secure as you go.
    • Repeat for the second ribbon and finish by checking the rolled ribbon and making any necessary adjustments.
    • Carefully tack one end of the narrow gathered green ribbon to the flower’s base
    • Wrap it around the wire stem 2 – 3 times, not pulling out the gathers.
    • Use a few stitches to secure the gathered band at the base of the flower.
    • Pull the remainder of this ribbon flat and wrap it tightly around the wire stem.
    • Secure the end with a few stitches and a dab of glue if needed.
    • Stitch the 2 faux suede leaves  to the stem
    • Sew the bloom onto the band where it suites you best.

    I’m going to Make Me Some of these Fun Sweet Hair embellishments. I simply LOVE them…!!  Just think of all the uses they have. You could make Ribbon Flowers  to add a Touch of Charm any where you place them…:)

    Poof Fairy It’s Adorable…!!!

    August 16, 2009

    Banana Milk Cake

    While at the beach last year, spending some priceless time with my Mom and Aunts, I ask them HOW TO MAKE a Milk Cake. I’d recently had some from a cafe and it was So Delicious. I remembered my grandmother making something similar to this and I wanted to know the method for this yummy flavor that seeped through all the layers.

    Beach 1

    My aunts and Mom only knew that my grandmother mixed Sugar and Milk together and boiled it on the stove until all the sugar was dissolved and somewhat thickened.  Then this Sweet Sticky Syrup was poured down into the cake layers by poking them with a knife to open up small slits for the sweet stuff to run down into. Then More Milky Syrup was poured over the entire layer that covered it as it drizzled down the outside edges.

    Beach 2 This cake was made with a Cake Box Mix…Yellow Layers… For the Sweet Milk Mixture she used about a Cup of Sugar and stirred in about one and a half cups of milk. Yes, I know, YOU want the exact measurements, right. Sorry, this is how my grandmother cooked. A pinch of this and a Dash of that..!!!  We added bananas on top and between the layers. Of course you can add Your Favorite Fruit or be creative with these Yummy Sticky Layers of Cake and dream up your own concoction.

    OK…If YOU have made a Milk Cake similar to this, Please tell Me your recipe or method. I’d LOVE to hear from YOU…!!!

    I will be expanding this idea to create more Yummy Sticky Desserts.  Oh, and by way, it was Simply Delicious…!!!!

    Poof Fairy It was GONE…!!!

    August 07, 2009

    Look Y’all

    When our vacation plans had to be cancelled because of my broken knee, this left me Very Disappointed…We were finally going to Savannah. I’d always wanted to go there and at last plans were made and we were going.  AND…. we were staying on Tybee Island at Paula Deen’s Beach House..!!! I can’t even TELL you how excited I was. I had made BIG PLANS to throw a Paula Party….just for HER…:) I’d collected special table top items and party goods to make it just PERFECT…!!!!  I’d even planned my blog post for this. So you can imagine how disappointed I was to have to give up my trip. BUT….LOOK at the SURPRISE I got at my door the other day..!!!

    Paula 1 It was a package from Paula….!!! How sweet of her…:) And look what she wrote to ME…!!!
    Paula 2 Well THIS certainly Cheered Me Up….:):):) To think that she took her time to send me a Get Well Wish means so much to me…!!! And I collect cook books. What a Special Book to add to my collection. THANK YOU Miss Paula….I’ll cherish this gift forever. And we’ll be there next spring or summer armed with lots of plans and surprises. We just can’t wait….:)

    OK Y’all….that’s it for now. Have a Great Week End. And oh by the way, I’ve decided that the Open House Week Ends I had planned for my blog is a little “Too Much” for me right now. I”m sorry, I just never realized how much time I would have to devote to just that one area.  I’m lucky to find time to create new post. I’m working on a few other ideas though that won’t be so time consuming and you will be seeing these pop up on my blog soon.

    Come back Monday for my Big News from Market…:)
    Thanks Y’all
    Poof Fairy I’ll be back soon..!!!

     
    Restored 316 Designs